MacOS UNIXコマンド locate

$ locate pytest

pipでpytestをインストールした際、whichとwhereisでpytestを探しても見つけられなかった
pipでアンインストールしようとしたら

$ python -m pip uninstall pytest
Found existing installation: pytest 6.2.4
Uninstalling pytest-6.2.4:
  Would remove:
    /Users/sakuraisusumu/.local/bin/py.test
    /Users/sakuraisusumu/.local/bin/pytest
    /Users/sakuraisusumu/.local/lib/python3.6/site-packages/_pytest/*
    /Users/sakuraisusumu/.local/lib/python3.6/site-packages/pytest-6.2.4.dist-info/*
    /Users/sakuraisusumu/.local/lib/python3.6/site-packages/pytest/*
Proceed (Y/n)? 

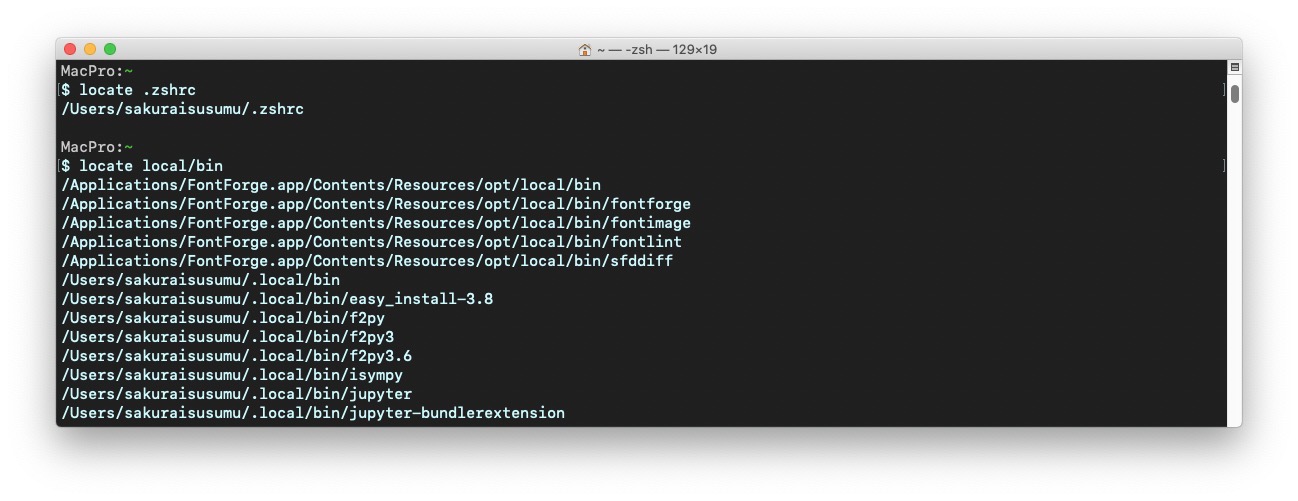
となり、/Users/sakuraisusumu/.local/bin/pytest にあることがわかった
これはこれで解決だが、
UNIXコマンドに検索があったはず(使ったことがなかった)と思いだし
findとlocateでpytestを探してみた

findは使い物にならない
locateはあらかじめデータベースを作っておくので全検索に近い
ところがだ
/Users/sakuraisusumu/.local/bin/pytest
が引っかからない
なぜだ?

locateを調べる

GNU版locateはfindutilsに入っているので

$ brew install findutils

によりインストールできる
glocateでpytestを検索するも変わらない

locateがデータベースをつくる歳にすべての領域を範囲とするわけでないことが判明
パーミッションが700である自分のディレクトリィの下は検索しない
そうだ

ということでHOMEにあるディレクトリでパーミッションが700のものを755に変更して
データベースをつくりなおしたところ今度は
/Users/sakuraisusumu/.local/bin/pytest
が見つかった

おかげでlocateについてだいぶわかった

MacOS Pythonにpytest インストール

$ python -m pip install pytest

インストールできたものの

$ pytest
zsh: command not found: pytest

あれれ?

$ which pytest
$ whereis pytest

だめだ、見つからない!
そこで一旦アンインストールすることに

$ python -m pip uninstall pytest
Found existing installation: pytest 6.2.4
Uninstalling pytest-6.2.4:
  Would remove:
    /Users/sakuraisusumu/.local/bin/py.test
    /Users/sakuraisusumu/.local/bin/pytest
    /Users/sakuraisusumu/.local/lib/python3.6/site-packages/_pytest/*
    /Users/sakuraisusumu/.local/lib/python3.6/site-packages/pytest-6.2.4.dist-info/*
    /Users/sakuraisusumu/.local/lib/python3.6/site-packages/pytest/*
Proceed (Y/n)? 

ここでようやくpytestの場所が判明
さっそく.zprofileにPATHを通してOK

dateで元号(令和平成昭和大正明治)表示

date → gdate

MacOS標準シェルzshのdateコマンドよりも
GNU系のdateコマンド(gdateコマンド)の方が気に入っている

$ which date
/bin/date
$ date
2021年 8月25日 水曜日 03時28分37秒 JST

このdateコマンドは次のようなGNU系dateコマンド(gdateコマンド)の作文ができない

$ date -d'10year 6month 3day 5hour 23minute 10second ago'

そこでgdateが使えるようにする

$ brew install coreutils

これによりglsやgdateのようなGNU版コマンドが100以上インストールされる
コマンドリストは次により確認できる

$ brew ls coreutils

ただgdateの標準出力が気にくわない

$ gdate
火  9  7 12:41:56 JST 2021

これはdateの出力のいいのでそれにあわせる
ついでに元号表示も工夫してみる

シェルスクリプト

.zprofile
に以下を追加

alias date="gdate +'%Y年%m月%d日%A%T'"
# 元号表示
function gendate()
{
y=(gdate +'%Y')
r=((y+1-2019))
h=((y+1-1989))
s=((y+1-1926))
t=((y+1-1912))
m=((y+1-1868))
n=(gdate +'%Y年%m月%d日%A%T')
echo '令和'r'年 平成'h'年 昭和's'年 大正't'年 明治'm'年 '$n
}

これで

$ date
2021年09月07日火曜日12:46:08

MacPro:~
$ date -d'10year 6month 3day 5hour 23minute 10second ago'
2032年03月10日水曜日18:09:05

MacPro:~
$ gendate
令和3年 平成33年 昭和96年 大正110年 明治154年 2021年09月07日火曜日12:46:19

これでOK

2段組PDFからテキスト抽出するコマンド

Mac標準でPDFからテキストを抜き出す簡単な方法はありません
Mac標準のAutomatorや専用アプリを使う必要があります
さらに二段組みPDFからテキスト抽出となると難しくなります

unixの「pdftotext」コマンドを使う方法なら1行でOK
二段組みのPDFにも対応します
hoge.pdf
から
hoge.txt
を生成するコマンドです

pdftotext -raw hoge.pdf - | sed ':loop; N; $!b loop; ;s/\n//g' >> hoge.txt
pdftotextのインストール

brewでpopplerをインストールすればOK

brew install poppler

次のコマンドがすべてインストールされる

pdftotext: converts PDF to text
pdftops: converts PDF to PostScript
pdftoppm: converts PDF pages to netpbm (PPM/PGM/PBM) image files
pdftopng: converts PDF pages to PNG image files
pdftohtml: converts PDF to HTML
pdfinfo: extracts PDF metadata
pdfimages: extracts raw images from PDF files
pdffonts: lists fonts used in PDF files
pdfdetach: extracts attached files from PDF files
pdfseparate: PDF to PNG/JPEG/TIFF/PDF/PS/EPS/SVG
pdfunite: PDF page merger

https://poppler.freedesktop.org/

pdfgray・pdfmin

pdfgray *.pdf → *.gray.pdf

スクリーンショット 71
MacOSのプレビューにはPDFグレイ変換オプションがある
ファイル→書き出す→グレイトーン
スクリーンショット 65
ところがやってみるとちゃんとグレイ変換されない
なぜか一部だけカラーのまま
これでは使い物にならない

そこでgsによるshellスクリプトの出番
以下のスクリプトを.zprofileに以下を追記するだけ
これでバッチリグレイPDFに変換できる

# pdfgray *.pdf
function pdfgray()
{
    local cnt=0
    for i in @; do
        gs -sDEVICE=pdfwrite \
           -sColorConversionStrategy=Gray \
           -dProcessColorModel=/DeviceGray \
           -dCompatibilityLevel=1.4 \
           -dNOPAUSE -dQUIET -dBATCH \
           -sOutputFile={i%%.*}.gray.pdf ${i} &
        (( (cnt += 1) % 4 == 0 )) && wait
    done
    wait && return 0
}

コンソール上で
pdfgray hoge.pdf
とすれば
hoge.gray.pdf
が出来上がる

$ pdfgray hoge.pdf
[3] 38381
[3]  + done       gs -sDEVICE=pdfwrite -sColorConversionStrategy=Gray  -dCompatibilityLevel=1.4
$ ls
hoge.pdf  hoge.gray.pdf
pdfmin *.pdf → *.min.pdf

おなじくプレビューのファイルサイズを減らすもイマイチ

.zprofile
に以下を追記

# pdfmin *.pdf
function pdfmin()
{
    local cnt=0
    for i in @; do
        gs -sDEVICE=pdfwrite \
           -dCompatibilityLevel=1.4 \
           -dPDFSETTINGS=/ebook \
           -dNOPAUSE -dQUIET -dBATCH \
           -sOutputFile={i%%.*}.min.pdf ${i} &
        (( (cnt += 1) % 4 == 0 )) && wait
    done
    wait && return 0
}

コンソール上で
pdfmin hoge.pdf
とすれば
hoge.min.pdf
が出来上がる

$ pdfmin hoge.pdf
[3] 38523
[3]  + done       gs -sDEVICE=pdfwrite -dCompatibilityLevel=1.4 -dPDFSETTINGS=/ebook -dNOPAUSE 
$ ls
hoge.pdf  hoge.min.pdf